
3. Deploying Applications
Deploying to Build transforms your application source code into a running, accessible service. By connecting your GitHub repository through the dashboard, Build handles the complexity of building, releasing, and running your application so you can focus on writing code.
This section covers everything you need to know about getting your application onto Build, from initial preparation through to advanced deployment workflows using release phases and custom buildpacks.
3.1 Preparing your app for deployment
Section titled “3.1 Preparing your app for deployment”Before deploying to Build, your application needs to meet a few requirements to ensure a smooth deployment process. Most of these are standard practices for modern web applications, and you may already have them in place.
Host Your Code on GitHub
Section titled “Host Your Code on GitHub”Build deploys applications directly from GitHub repositories. Your application code should be hosted in a GitHub repository that you have access to—either in your personal account or in an organisation you belong to.
If your project isn’t already a Git repository, initialise one and push it to GitHub:
$ cd my-app$ git init$ git add .$ git commit -m "Initial commit"$ git remote add origin https://github.com/you/my-app.git$ git push -u origin mainYour application code must be committed and pushed to GitHub before it can be deployed. Build deploys whatever is in your repository at the time of deployment—uncommitted or unpushed changes are not included.
Declare Dependencies
Section titled “Declare Dependencies”Build needs to know what dependencies your application requires. This is done through the standard dependency file for your language or framework:
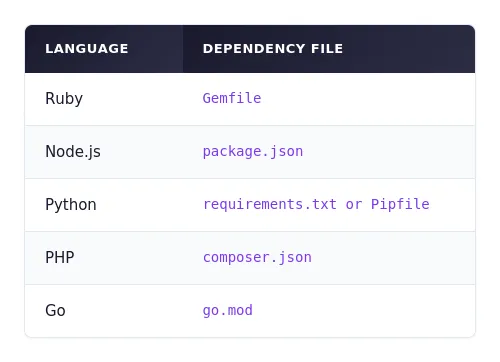
These files should be located in the root directory of your repository. Build uses them both to detect your application’s language and to install the necessary dependencies during the build process.
Add a Procfile
Section titled “Add a Procfile”While Build can often detect how to start your application automatically, adding a Procfile gives you explicit control over the commands used to run your app. A Procfile is a simple text file named Procfile (no extension) placed in the root of your repository.
For example, a simple ruby web application using the puma web server might have:
web: bundle exec puma -C config/puma.rbSee section 3.4 for detailed information on Procfiles and process types.
Use Environment Variables for Configuration
Section titled “Use Environment Variables for Configuration”Following the twelve-factor app methodology, your application should read configuration from environment variables rather than hardcoding values. This includes database URLs, API keys, feature flags, and any other environment-specific settings.
Build provides a straightforward way to manage these through config vars, which are securely injected into your application’s environment at runtime. You can manage config vars through the Apps’s Settings tab:

3.2 Deploying
Section titled “3.2 Deploying”Build deploys applications directly from GitHub repositories through the dashboard. You connect your repository once, and then trigger deployments manually or automatically whenever you push changes to GitHub.
Step 1: Create an App
Section titled “Step 1: Create an App”Locate the New + dropdown button next to your avatar in the top-right corner of the page. Click New App from this menu.
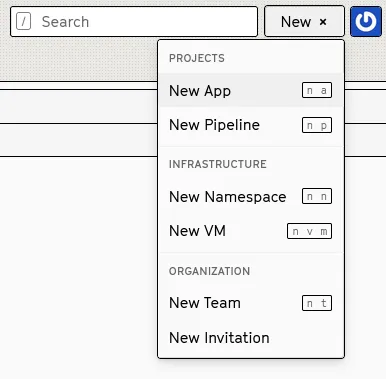
On the page that opens, give your app a name and select your preferred region (e.g., us-east-1). Click Create App to proceed.
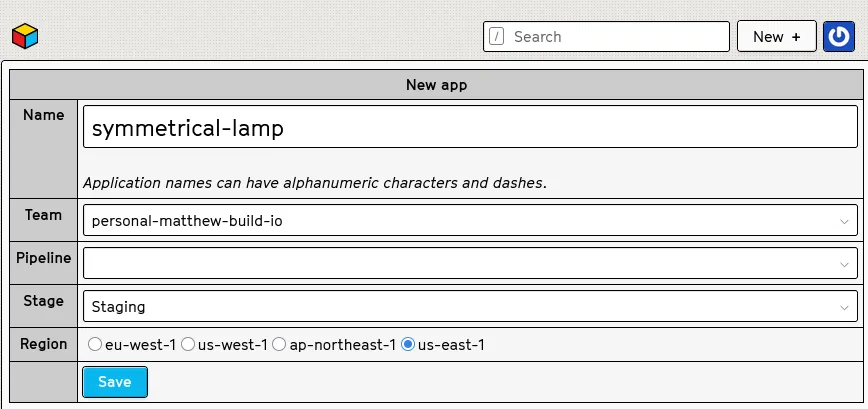
You’ll be taken to your new app’s overview page, with various tabs along the top for managing different aspects of your application.
Step 2: Select a Stack
Section titled “Step 2: Select a Stack”Click on the Settings tab. Locate the Stack section and select the latest Heroku stack if you want to build your app using the recommended buildpack approach.
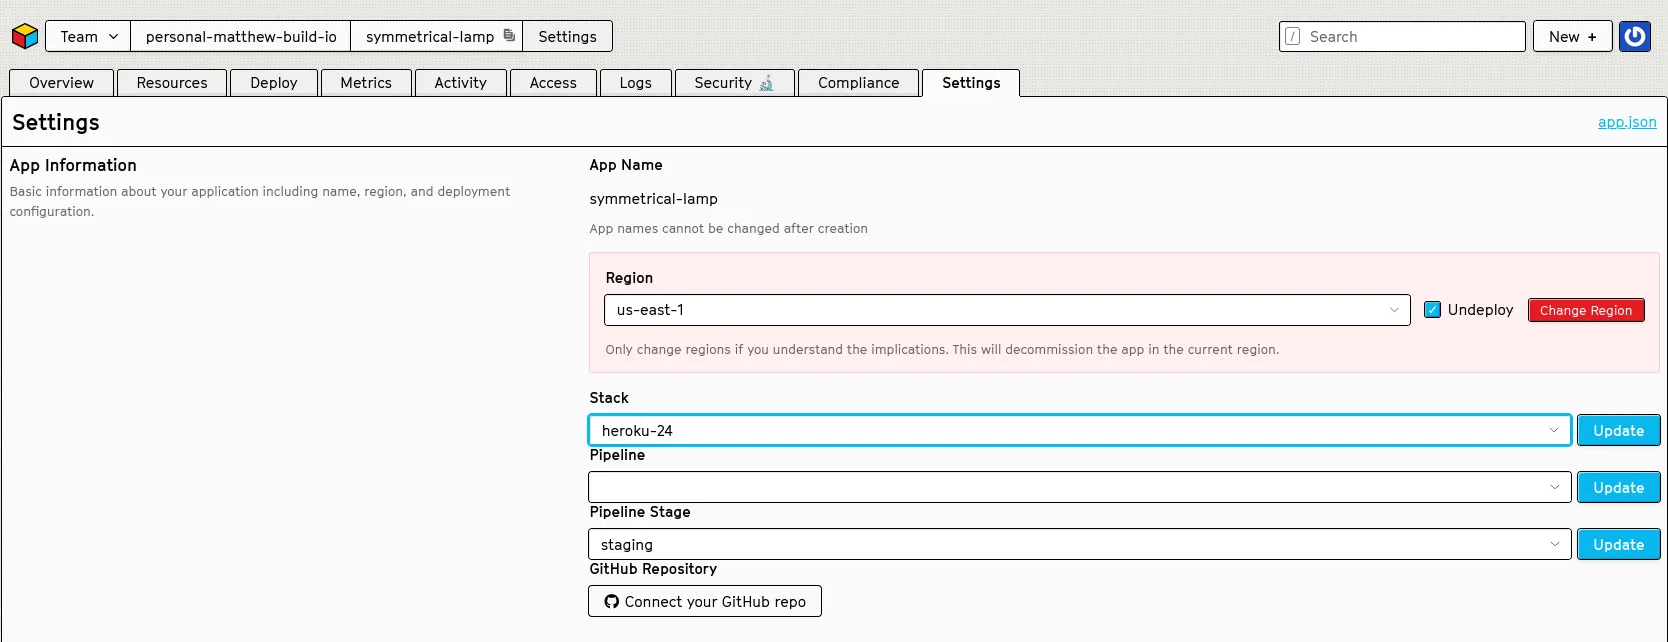
The stack determines the base operating system and runtime environment for your application. For most applications, the default stack provides everything you need.
Step 3: Configure Buildpacks
Section titled “Step 3: Configure Buildpacks”Further down on the Settings page, locate the Buildpacks section. Add any language or framework-specific buildpacks that your application requires.
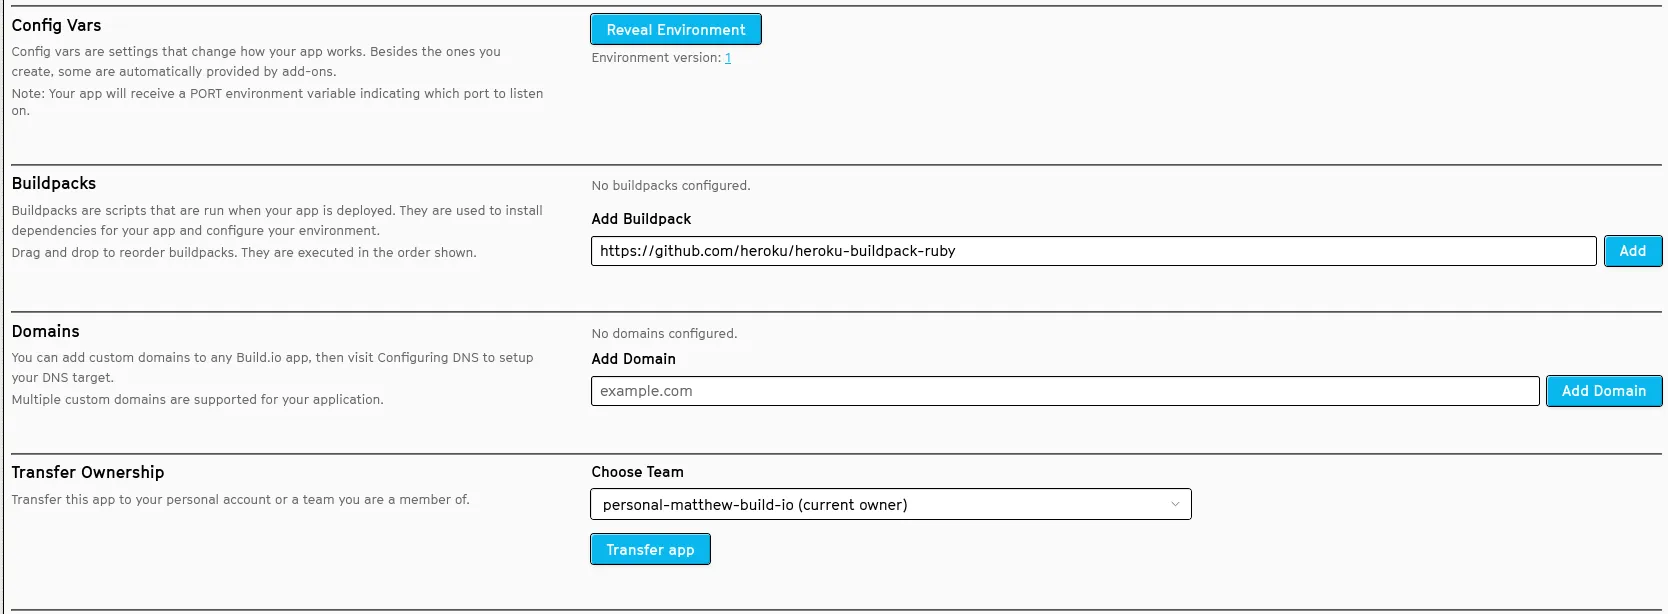
For example, if you’re deploying a Ruby application, add the official Heroku Ruby buildpack by specifying the full path to its GitHub repository:
https://github.com/heroku/heroku-buildpack-ruby
For most common languages, Build can auto-detect the appropriate buildpack. However, explicitly specifying buildpacks gives you more control and ensures consistent builds. See section 3.4 for more details on buildpacks.
Step 4: Connect Your GitHub Repository
Section titled “Step 4: Connect Your GitHub Repository”Click on the Deploy tab, then locate the Connection section. This is where you connect your app to a GitHub repository.
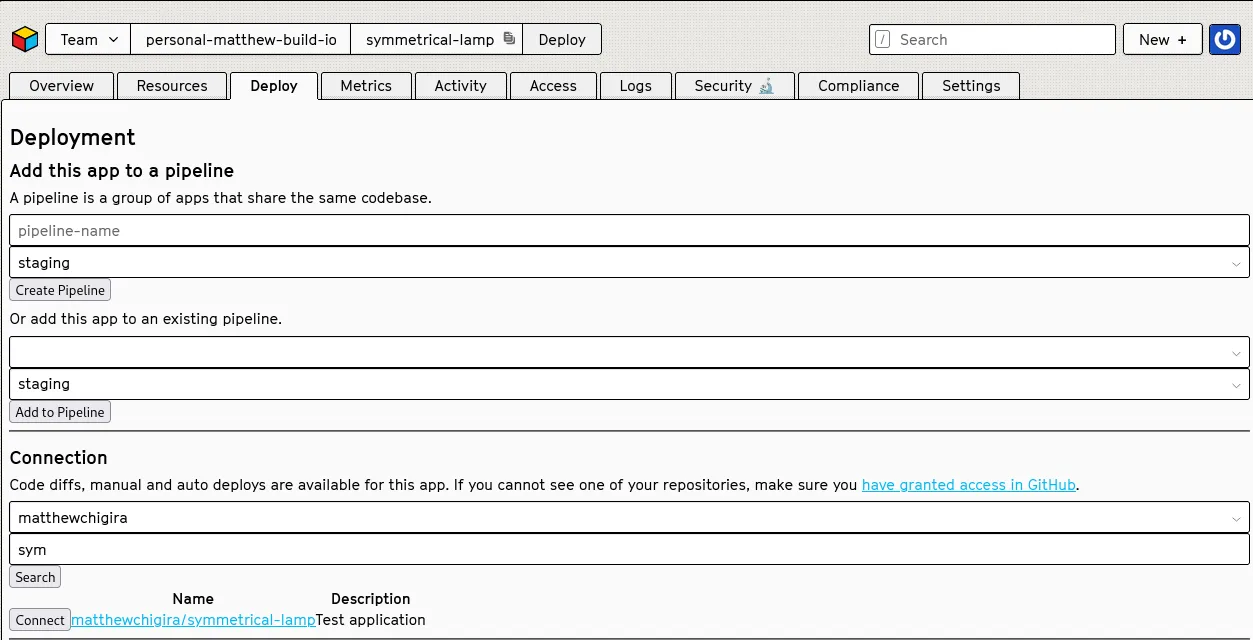
Select your GitHub organisation from the dropdown, then search for the repository name. From the results, click Connect next to the repository you want to deploy.
Once connected, the Connection section will display a confirmation showing the linked repository.

Step 5: Deploy
Section titled “Step 5: Deploy”Scroll to the bottom of the Deploy page to find the Manual Deploy section. Select the branch you want to deploy and click Deploy Branch.

You’ll be redirected to the Build page, which shows your application being built in real-time. You can watch as Build detects your application type, installs dependencies, and compiles your code.
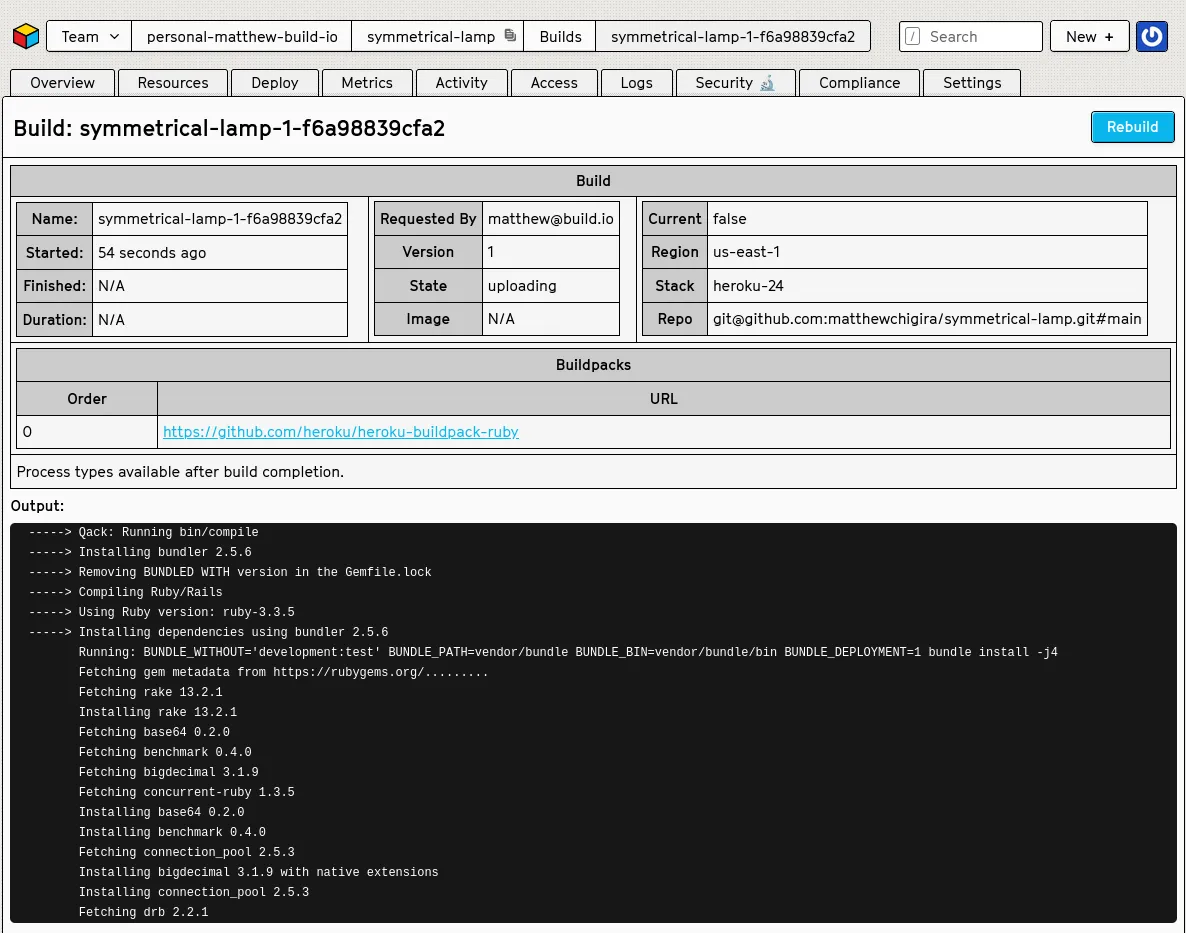
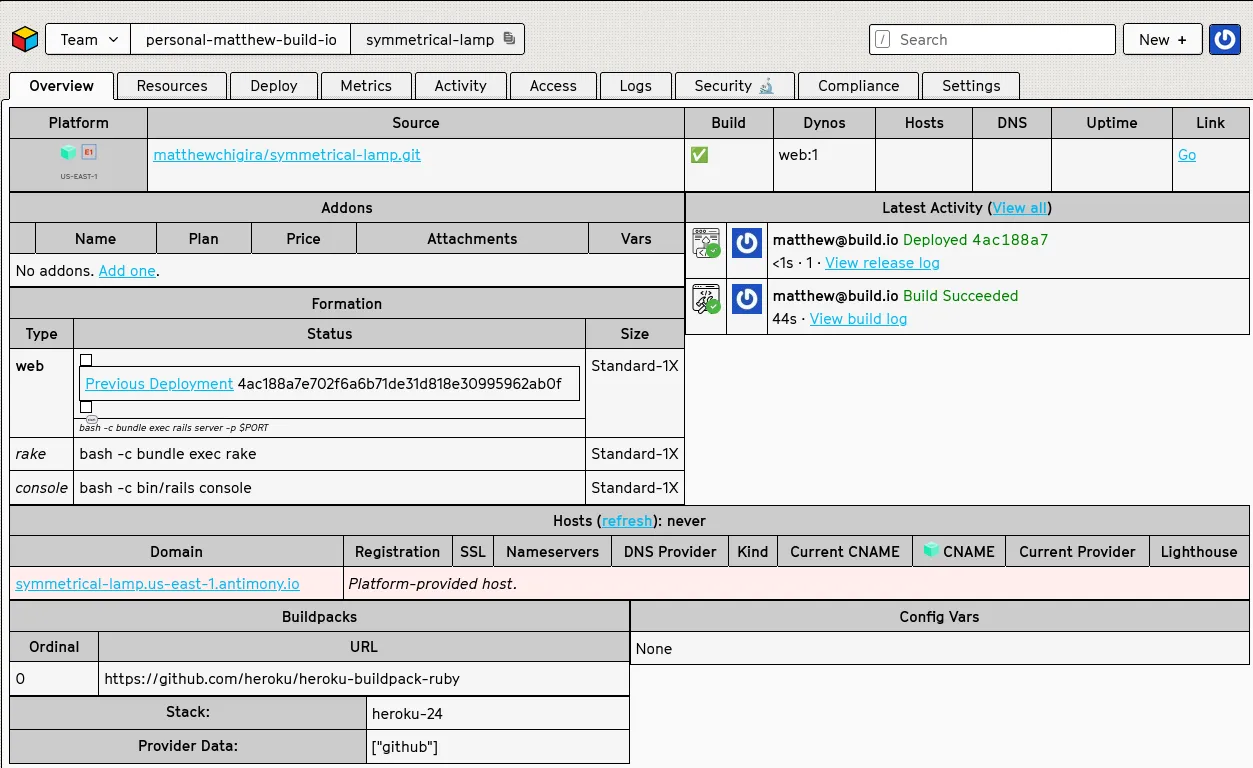
Once the build completes successfully, your application is automatically deployed. Navigate to the Overview tab to see your app’s status, including when it was last built and deployed. Click the Go link in the top-right corner to open your newly deployed application.
3.3 Buildpacks
Section titled “3.3 Buildpacks”Buildpacks handle the heavy lifting of turning your source code into something that can actually run on Build’s infrastructure. They figure out what language you’re using, pull in all your dependencies, compile everything that needs compiling, and set up the runtime environment—without you having to configure any of it manually.
How Buildpacks Work
Section titled “How Buildpacks Work”Buildpacks operate through a three-stage process. First, during detection, Build scans your repository looking for signature files that indicate which language or framework you’re using—for instance, the Ruby buildpack looks for a Gemfile, while the Node.js buildpack looks for package.json. Next comes compilation, where the matched buildpack takes over: it downloads your dependencies, compiles assets if needed, and packages everything into a deployable unit. Finally, the release stage outputs any default configuration your application needs at runtime.
Setting Buildpacks via the Dashboard
Section titled “Setting Buildpacks via the Dashboard”Navigate to your app’s Settings tab and scroll to the Buildpacks section. Click Add Buildpack and enter either the name of an official buildpack or the full URL to a custom buildpack’s GitHub repository.
For example, to add the official Ruby buildpack:
https://github.com/heroku/heroku-buildpack-ruby
Buildpacks are executed in the order they appear in the list. You can drag to reorder them or remove buildpacks you no longer need.
Using Multiple Buildpacks
Section titled “Using Multiple Buildpacks”Some applications require multiple buildpacks. A common example is a Ruby on Rails application that also needs Node.js for asset compilation. Build executes buildpacks in order, with each one able to use binaries installed by previous buildpacks.
For example, a Rails application with JavaScript assets might have:
1. https://github.com/heroku/heroku-buildpack-nodejs
2. https://github.com/heroku/heroku-buildpack-ruby
Third-Party and Custom Buildpacks
Section titled “Third-Party and Custom Buildpacks”If your application uses a language or framework not covered by official buildpacks, you can use third-party buildpacks by specifying their Git URL in the Buildpacks section of the Settings tab.
You can also create your own buildpack to support custom build processes or languages. At its core, a buildpack is a collection of three shell scripts: bin/detect checks whether the buildpack is appropriate for a given codebase, bin/compile handles dependency installation and asset compilation, and bin/release outputs configuration for the runtime environment.
3.4 Procfiles and process types
Section titled “3.4 Procfiles and process types”The Procfile is where you tell Build exactly how to run your application. It’s a simple configuration file that maps process names to the commands that start them, giving you fine-grained control over what happens when your dynos boot up.
Procfile Basics
Section titled “Procfile Basics”Create a file called Procfile (no file extension, capitalised P) and place it in your repository’s root directory. Inside this file, each line defines one process type using this format:
process_name: command to executeFor example, a simple web application might have:
web: bundle exec puma -C config/puma.rbA more complex application with background processing might include:
web: bundle exec puma -C config/puma.rbworker: bundle exec sidekiqThe Web Process Type
Section titled “The Web Process Type”Among all process types, web holds a unique role: Build’s routing layer forwards incoming HTTP requests exclusively to processes of this type. Any application that needs to respond to web traffic must define a web process.
Your web process must listen on the port specified by the $PORT environment variable. When using Puma, this is typically configured in config/puma.rb:
port ENV.fetch("PORT") { 3000 }And referenced in your Procfile:
web: bundle exec puma -C config/puma.rbOther Process Types
Section titled “Other Process Types”Beyond the web process, you can define any number of additional process types to handle work that doesn’t involve responding to HTTP requests. These run as separate dynos and are ideal for background job processing, scheduled tasks, or long-running operations.
Popular use cases include worker processes that pull jobs from a queue (using tools like Sidekiq or Resque), clock processes that trigger scheduled tasks at specific intervals, and release processes that run during deployment.
Enabling Automatic Deploys
Section titled “Enabling Automatic Deploys”For continuous deployment, you can configure Build to automatically deploy whenever you push to a specific branch on GitHub. On the Deploy tab, locate the Automatic Deploys section, select your branch, and click Enable Automatic Deploys.
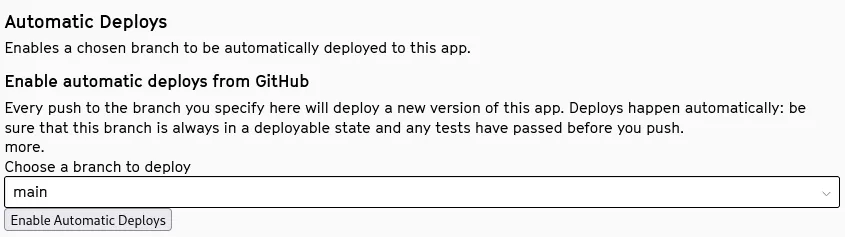
With automatic deploys enabled, every push to the configured branch triggers a new build and deployment—no need to visit the dashboard.
Redeploying
Section titled “Redeploying”To deploy a new version of your application, simply push your changes to GitHub. If automatic deploys are enabled, Build will detect the new commits and start a build automatically.
If you’re using manual deploys, navigate to the Deploy tab and click Deploy Branch in the Manual Deploy section to trigger a new build from the latest commit on your selected branch.
Deploying a Specific Commit
Section titled “Deploying a Specific Commit”By default, Build deploys the latest commit on your selected branch. If you need to deploy a specific commit (for example, to roll back to a previous version), you can do so from the Activity tab by locating the previous successful build and clicking “Rollback to here”.
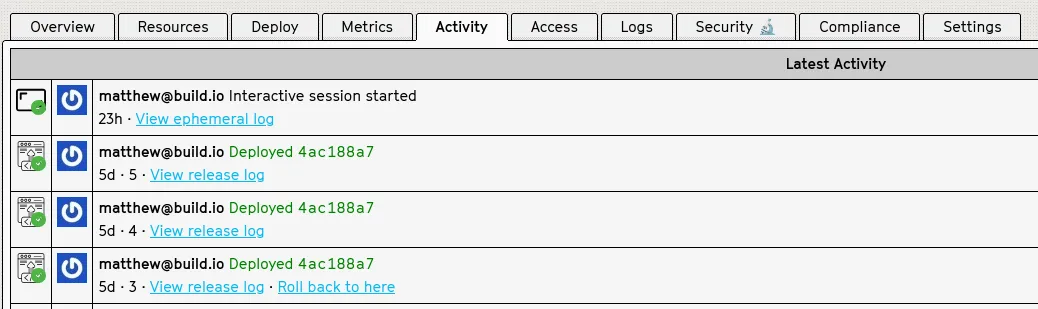
The same history is available from the CLI: bld builds -a my-app lists an app’s builds, and bld deployments -a my-app lists its deployments with the current one marked. See the CLI Command Reference for the full set of options.
3.5 Container/Docker deployments
Section titled “3.5 Container/Docker deployments”For applications that require custom system dependencies, specific runtime versions, or a precisely controlled environment, Build supports deploying Docker containers directly. This gives you complete control over your application’s runtime environment while still benefiting from Build’s managed infrastructure, routing, and add-ons ecosystem.
When to Use Container Deployments
Section titled “When to Use Container Deployments”Container deployments are ideal when you need to install system-level dependencies not available in the standard Build runtime (such as FFmpeg, ImageMagick, or custom libraries), use a specific Linux distribution or base image, maintain an existing Docker-based workflow, or run applications in languages not officially supported by Build’s buildpacks.
For most applications, Build’s buildpack-based deployments are simpler and provide automatic security updates to the base image. Only use container deployments when you have a specific requirement that buildpacks cannot meet.
Setting Up Dockerfile Deployments
Section titled “Setting Up Dockerfile Deployments”To use a Dockerfile instead of buildpacks, you need to change your app’s stack setting and add a Dockerfile to your repository.
Step 1: Add a Dockerfile to Your Repository
Section titled “Step 1: Add a Dockerfile to Your Repository”Create a Dockerfile in the root of your repository. Here’s a simple example for a Ruby application:
FROM ruby:3.2-alpineRUN apk add --no-cache build-base postgresql-dev yaml-dev ruby-devWORKDIR /appCOPY Gemfile Gemfile.lock ./RUN bundle installCOPY . .EXPOSE 3000CMD ["bundle", "exec", "puma", "-C", "config/puma.rb"]The CMD instruction defines how your application starts. This becomes your web process.
Step 2: Set the Stack to Dockerfile
Section titled “Step 2: Set the Stack to Dockerfile”Navigate to your app’s Settings tab in the dashboard. In the Stack section, select dockerfile from the dropdown.
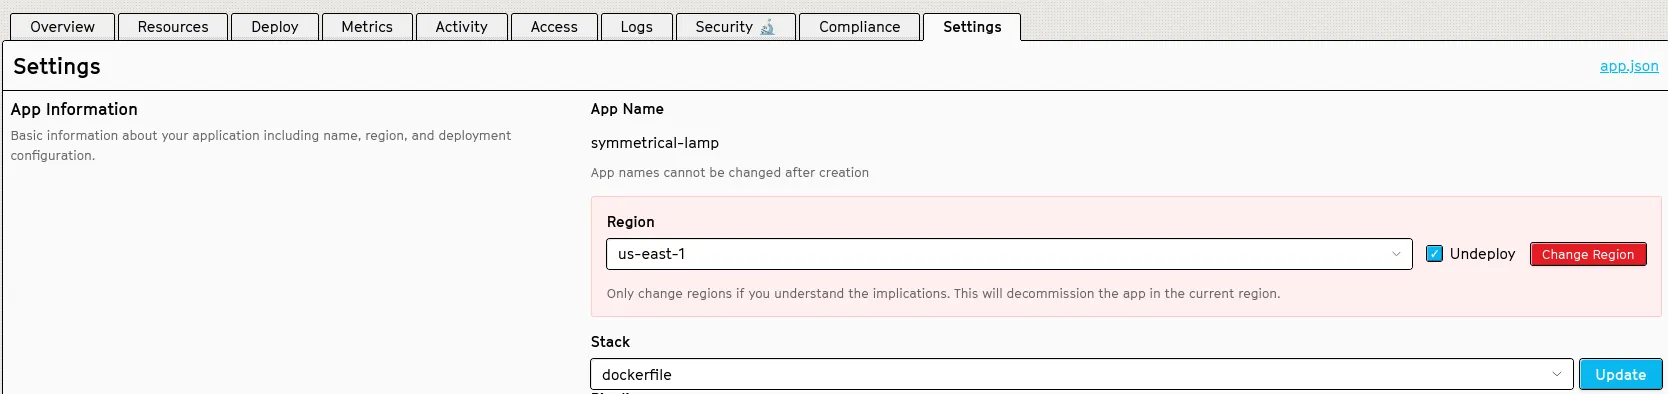
This tells Build to use your Dockerfile for builds instead of auto-detecting and running buildpacks.
Step 3: Deploy
Section titled “Step 3: Deploy”With the stack set and your Dockerfile committed to the repository, deploy as normal from the Deploy tab. Build will:
- Pull your source code from GitHub
- Locate the Dockerfile in your repository root
- Build the image
- Push the image to Build’s internal registry
- Deploy the container to your dynos
You can watch the build progress in real-time on the Build page, just like with buildpack deployments.
Process Types with Dockerfile Deployments
Section titled “Process Types with Dockerfile Deployments”When using a Dockerfile, Build creates a single web process type based on your image’s CMD or ENTRYPOINT instruction. This differs from buildpack deployments, which can extract multiple process types from a Procfile.
If your application needs background workers or other process types, you have a couple of options. You can use the same image with different commands by configuring additional process types in the Resources tab, overriding the default command for each. Alternatively, for more complex setups, you might keep your workers as a separate app with its own Dockerfile.
Listening on the Correct Port
Section titled “Listening on the Correct Port”Just like with buildpack deployments, your application must listen on the port specified by the PORT environment variable. Build injects this variable at runtime and routes traffic to it.
Make sure your application reads from this environment variable rather than hardcoding a port:
CMD ["bundle", "exec", "puma", "-C", "config/puma.rb", "-p", "$PORT"]Or configure it in your application’s server configuration file.
Best Practices
Section titled “Best Practices”Keep your images small by using Alpine-based images where possible, and use multi-stage builds to separate build-time dependencies from runtime dependencies. This reduces deployment times and improves cold-start performance.
Layer your Dockerfile efficiently by copying dependency files (like Gemfile or package.json) before copying your full source code. This allows Docker to cache the dependency installation layer and only rebuild it when dependencies change.
Always specify explicit version tags for your base images rather than using latest. This ensures reproducible builds and prevents unexpected changes when base images are updated.
3.6 Release phases and hooks
Section titled “3.6 Release phases and hooks”Sometimes you need to run a task every time you deploy—migrating your database, clearing a cache, or uploading assets to a CDN. The release phase gives you a hook to do exactly that: a command that runs after your code is built but before your new dynos start accepting traffic.
How Release Phase Works
Section titled “How Release Phase Works”Here’s what happens during a deployment with a release phase configured: Build first compiles your code and creates a deployable slug. Before spinning up your new dynos, it launches a temporary one-off dyno and runs your release command. If that command completes successfully (exits with code 0), the new version goes live. If something goes wrong and the command fails, Build halts the deployment entirely—your existing version keeps running as if nothing happened.
Defining a Release Phase
Section titled “Defining a Release Phase”Add a release process type to your Procfile:
release: bundle exec rails db:migrateweb: bundle exec puma -C config/puma.rbFor an application with background workers:
release: bundle exec rails db:migrateweb: bundle exec puma -C config/puma.rbworker: bundle exec sidekiqThe release command has access to all your application’s config vars, including database connection strings and other secrets.
Common Release Phase Tasks
Section titled “Common Release Phase Tasks”Release phases are commonly used for:
Database schema migrations – ensuring your database structure matches your new code before it starts serving requests
Uploading compiled assets – sending CSS, JavaScript, and images to a CDN or object storage
Priming or invalidating caches – warming up caches with new data or clearing stale entries
Running data transformation scripts – backfilling data or updating records to match new code expectations
Sending deployment notifications – alerting external services that a new version is being deployed
Retrying a Failed Release
Section titled “Retrying a Failed Release”If a release failed due to a temporary issue (such as a database being momentarily unavailable) rather than a code problem, you can retry the deployment. Navigate to the Deploy tab and click Deploy Branch to trigger a fresh build and release from the same commit.
Design Considerations
Section titled “Design Considerations”When using release phases, keep in mind that the release command runs in a one-off dyno with the new code but before the new dynos start. This means your new code must be compatible with the current database state before the release command runs.
For database migrations, ensure they are backwards-compatible so that if the deployment is rolled back, the previous code version can still function. A recommended approach is to make additive changes first (adding new columns or tables), deploy code that can work with both old and new schemas, then remove old columns or tables in a later release once all code is using the new schema.
3.7 Deploying with Git
Section titled “3.7 Deploying with Git”Build apps come with a Git remote you can push to. Pushing a branch to that remote uploads your source, runs the buildpacks, and releases the result — the same pipeline the dashboard uses, without leaving your terminal.
This is an alternative to connecting a GitHub repository through the dashboard, which is covered in 3.2. Use whichever suits your workflow; an app can use both.
Prerequisites
Section titled “Prerequisites”You need Git and the Build CLI installed, and you need to be logged in:
$ bld loginbld login writes credentials to ~/.netrc for both the API host and the Git host, so git push works immediately afterwards with no extra setup.
Your project must also be a Git repository. If it isn’t one yet:
$ cd my-app$ git init$ git add .$ git commit -m "My first commit"Adding the Build Remote
Section titled “Adding the Build Remote”Every app exposes its push URL through bld apps:info. Read it out and add it as a remote:
$ GIT_URL=$(bld apps:info -a example-app -j | jq -r '.git_url')$ git remote add build "$GIT_URL"This is a one-time step per clone. If you’re starting from scratch, create the app first:
$ bld apps:create example-app -t my-teamRenaming a Remote
Section titled “Renaming a Remote”The remote name is just a local label — nothing on Build depends on it. Name it after the environment when you have more than one:
$ git remote rename build build-stagingDeploying Your Code
Section titled “Deploying Your Code”Push the branch you want to deploy to the remote’s main branch:
$ git push build mainBuild only deploys the remote’s main branch. To deploy from a differently named local branch, use the local:remote refspec form:
$ git push build my-feature:mainOnly committed code is deployed. Uncommitted or unstaged changes stay on your machine.
Once the push completes, check that the release came up:
$ bld ps -a example-app$ bld logs -a example-appMultiple Remotes and Environments
Section titled “Multiple Remotes and Environments”Each Build app has its own Git URL, so a staging app and a production app are simply two remotes in the same clone:
$ git remote add build-staging $(bld apps:info -a example-app-staging -j | jq -r '.git_url')$ git remote add build-production $(bld apps:info -a example-app -j | jq -r '.git_url')Deploy to whichever you mean:
$ git push build-staging mainIf staging and production belong to the same pipeline, promote instead of pushing twice — promotion moves the already-built slug downstream rather than rebuilding it:
$ bld pipelines:diff -a example-app-staging$ bld pipelines:promote -a example-app-stagingSee CI/CD and Pipelines for the full workflow.
Git Authentication
Section titled “Git Authentication”Build’s Git remotes are HTTPS, not SSH, so there are no deploy keys to manage. Authentication uses HTTP Basic with your API credentials, which bld login stores in ~/.netrc.
If a push fails with an authentication error, your credentials have most likely expired. Run bld login again to refresh them.
3.8 Deploy to Build button
Section titled “3.8 Deploy to Build button”The Deploy to Build button lets anyone spin up a running copy of your app on Build with a single click—no dashboard setup required. It’s a great addition to open-source projects, starter templates, and any README where you want visitors to try out the app themselves instead of just reading about it.
Build’s deploy button follows Heroku’s Button conventions: if you’ve already set up a Heroku deploy button, migrating to Build is mostly a matter of swapping URLs, with a few app.json differences to check (see the app.json and Heroku migration sections below).
Adding the button to your README
Section titled “Adding the button to your README”Add the button image to your repository’s README, linking it to Build’s deploy endpoint:
[](https://app.build.io/deploy?template=https://github.com/your-username/your-repo)Or as HTML, if you want more control over sizing:
<a href="https://app.build.io/deploy?template=https://github.com/your-username/your-repo"> <img src="https://app.build.io/deploy-to-build-button.svg" alt="Deploy" width="150px"></a>You can also omit the template parameter and let Build infer the repository from the browser’s referrer. This only works when the button is clicked from a GitHub README page, so we recommend always specifying template explicitly.
Clicking the button takes visitors to Build, where they can review the app name, region, and config vars before approving the deployment.
URL parameters
Section titled “URL parameters”The deploy endpoint accepts the following parameters:
template— The GitHub repository to deploy. Accepts a full URL (https://github.com/your-username/your-repo), a baregithub.com/...path, or justowner/repo. Optional if the request has a GitHub referrer, but recommended—see above.app[name]— A suggested name for the new app, e.g.app[name]=my-awesome-app. Build appends a short random suffix to keep names unique, so the deployed app is named something likemy-awesome-app-a1b2c3d4.app[region]— The region to deploy into, e.g.app[region]=us-east-1.env[VARIABLE_NAME]— Pre-fills or overrides a config var, e.g.env[DATABASE_URL]=postgres://.... Include multiple variables by repeating the parameter:env[API_KEY]=abc123&env[SECRET_KEY]=xyz789.express— Set totrueto skip the confirmation page and deploy immediately.
Build always deploys the repository’s default branch. Extra path segments in template—/tree/my-branch, /blob/main/README.md, /pull/123—are accepted and ignored, so a button can link from anywhere in your repo, but there’s currently no way to target a specific branch or tag.
A complete example combining several parameters:
https://app.build.io/deploy?template=https://github.com/myorg/myapp&app[name]=production-app&app[region]=us-west-2&env[NODE_ENV]=productionConfiguring the deploy with app.json
Section titled “Configuring the deploy with app.json”Build reads your repository’s app.json to configure the deployment: the app’s name and metadata, its config vars, its add-ons, and its buildpacks. Build follows Heroku’s app.json schema, but not every field is implemented—see the notes after the sample before copying a Heroku app.json across.
{ "name": "My Application", "description": "A sample application", "repository": "https://github.com/myorg/myapp", "keywords": ["productivity", "rails"], "env": { "WEB_CONCURRENCY": { "description": "The number of processes to run.", "value": "5" } }, "addons": [ "schema-to-go:basic" ], "buildpacks": [ { "url": "heroku/ruby" } ]}A few differences from Heroku’s schema to keep in mind:
- Add-on names are Build’s, not Heroku’s. Build provisions an add-on only when the service and plan both exist in Build’s catalog, so use names like
schema-to-go:basicrather thanheroku-postgresql:hobby-dev. An unrecognized name is skipped silently—the app deploys without the add-on and without an error, so double-check the app’s add-ons after your first deploy. - Set config vars on the button URL, not in
app.json. On a button deploy the app’s config vars are replaced after the app is created fromapp.json, so theenvblock doesn’t reach the running app—onlyenv[...]parameters from the URL do. Build also doesn’t prompt visitors for required vars, and Heroku’sgenerator: "secret"isn’t supported, so generate secrets yourself and pass them asenv[...]. Keep theenvblock for documentation if you like, but don’t depend on it. scripts.postdeployisn’t executed yet. Build stores it but doesn’t run it, so put migrations in your release or startup command rather than relying on a postdeploy hook.
app.json is required for button deploys, and it must include a buildpacks array—unlike a normal deploy, the button flow doesn’t auto-detect a buildpack (see 3.3). A deploy against a repository with no app.json fails with a message asking you to add one.
Migrating from Heroku
Section titled “Migrating from Heroku”Build’s deploy endpoint accepts the same URL parameters as Heroku’s, so migrating an existing Heroku button starts with swapping the URL:
Before:
https://heroku.com/deploy?template=https://github.com/myorg/myappAfter:
https://app.build.io/deploy?template=https://github.com/myorg/myappYour env[...] and app[...] parameters carry over unchanged. Your app.json needs two edits: rename any Heroku add-ons to their Build equivalents, and move work out of scripts.postdeploy, since Build doesn’t run it yet. See the app.json section above for both.